How to Backup & Protect AWS EKS using Velero from vmware-tanzu

SHARE THE BLOG
Introduction
Kubernetes backup refers to the process of creating a copy of the Kubernetes resources and data to protect against data loss and to ensure business continuity. Backing up Kubernetes resources, such as deployments, statefulsets, and services, is critical to ensure that your applications can be quickly restored in case of a catastrophic failure.
There are several Kubernetes backup tools available, including open-source solutions like Velero and commercial solutions from vendors like VMware and Trilio. These tools provide an easy and efficient way to backup and restore Kubernetes resources and data.
Kubernetes backup can be performed at the cluster level, namespace level, or even at the resource level. This provides granular control over the backup process and enables you to create backups that meet specific business requirements.
When implementing Kubernetes backup, it is important to consider factors such as the frequency and scope of backups, recovery point objectives (RPOs), and recovery time objectives (RTOs). Testing backups regularly is also critical to ensure that they can be successfully restored in case of a failure.
Prerequisites
We assume that the reader has basic knowledge of kubernetes ,Helm, AWS.
Overview of Velero
Velero is an open-source tool that enables backup and disaster recovery of Kubernetes clusters and their persistent volumes. It can be used to back up your Kubernetes resources, including namespace, deployment, statefulset, cronjob, and others, as well as the persistent volumes associated with them.
Velero consists of two components:
- A Velero server pod that runs in your Amazon EKS cluster
- A command-line client (Velero CLI) that runs locally
How Velero Backup works
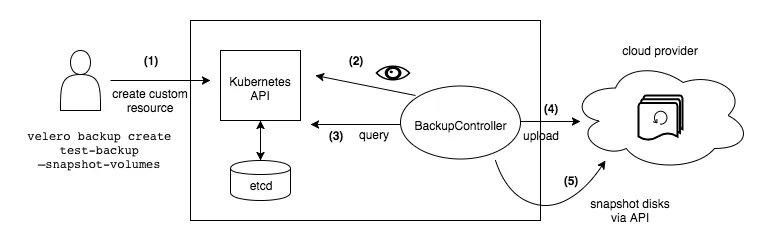
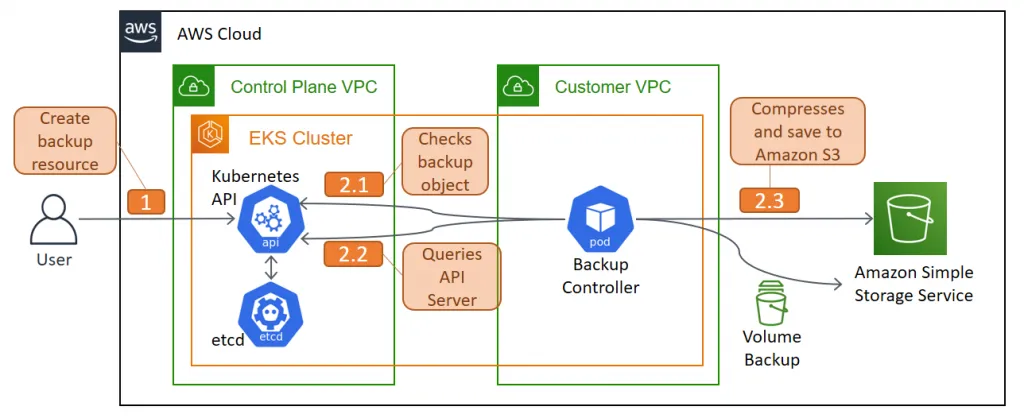
When you run velero backup create test-backup:
- The Velero client makes a call to the Kubernetes API server to create a Backup object.
- The BackupController notices the new Backup object and performs validation.
- The BackupController begins the backup process. It collects the data to back up by querying the API server for resources.
- The BackupController makes a call to the object storage service – for example, AWS S3 – to upload the backup file.
By default, velero backup create makes disk snapshots of any persistent volumes. You can adjust the snapshots by specifying additional flags. Run velero backup create –help to see available flags. Snapshots can be disabled with the option –snapshot-volumes=false.
How Velero Restore works
- The Velero CLI makes a call to Kubernetes API server to create a restore CRD that will restore from an existing backup.
- The restore controller:
- Validates the restore CRD object.
- Makes a call to Amazon S3 to retrieve backup files.
- Initiates restore operation.
The restore operation allows you to restore all of the objects and persistent volumes from a previously created backup. You can also restore only a filtered subset of objects and persistent volumes.
By default, backup storage locations are created in read-write mode. However, during a restore, you can configure a backup storage location to be in read-only mode, which disables backup creation and deletion for the storage location. This is useful to ensure that no backups are inadvertently created or deleted during a restore scenario.
Overview of AWS EKS
AWS EKS (Elastic Kubernetes Service) is a fully managed service that allows you to easily run, scale, and manage Kubernetes clusters on AWS. Kubernetes is an open-source platform for container orchestration that is widely used for deploying and managing containerized applications.
With AWS EKS, you can quickly provision a Kubernetes cluster in a few simple steps, and the service takes care of the underlying infrastructure and management tasks, such as scaling, patching, and upgrading the cluster. This means you can focus on deploying and managing your applications, rather than worrying about the underlying infrastructure.
AWS EKS integrates with other AWS services, such as Amazon Elastic Container Registry (ECR) for storing and managing container images, and AWS Identity and Access Management (IAM) for managing access to your Kubernetes resources. Additionally, EKS provides a number of built-in integrations with other AWS services and third-party tools, such as AWS CloudFormation for infrastructure as code and Grafana for monitoring and observability.
Implementing Velero on EKS
When it comes to using Velero on Amazon Web Services (AWS) Elastic Kubernetes Service (EKS), there are a few steps that need to be taken. Here’s a general outline of the process:
- Install Velero: Velero can be installed on EKS using the Helm chart.
- Configure Velero: After installing Velero, you’ll need to configure it to specify which resources you want to back up and where to store the backups. This can be done by creating a Velero custom resource definition (CRD)
- Create a storage location: To store your backups, you’ll need to create a storage location. This can be done using an Amazon S3 bucket, which can be created using the AWS Management Console.
- Backup your resources: Once Velero is configured, you can create a backup of your Kubernetes resources using the command velero backup create <backup-name>.
- Restore your resources: If you need to restore your resources, you can do so using the command velero restore create <restore-name> –from-backup <backup-name>.
These are just the basic steps for using Velero on AWS EKS. There are many additional options and features available with Velero that can be customized to fit your specific needs.
Step 1: Prerequisites
All the instructions are in Linux if you are using Mac or Windows please check out the provided links with each step.
AWS CLI version 2
curl “https://awscli.amazonaws.com/awscli-exe-linux-x86_64.zip" -o “awscliv2.zip” unzip awscliv2.zip sudo ./aws/install
Install eksctl on your desktop machine
					curl — silent — location “https://github.com/weaveworks/eksctl/releases/latest/download/eksctl_$(uname -s)_amd64.tar.gz” | tar xz -C /tmp

sudo mv /tmp/eksctl /usr/local/bin

eksctl version
Helm
					curl -fsSL -o get_helm.sh https://raw.githubusercontent.com/helm/helm/main/scripts/get-helm-3
chmod 700 get_helm.sh
./get_helm.sh
Kubectl
Step 2: Create two EKS Clusters as below
Two EKS clusters in the same AWS account. See Creating an EKS Cluster. (This blog post was tested with EKS running Kubernetes version 1.24.)
The two clusters will be referred to as the Primary and Recovery clusters.
Configure all the required environment as below:
					BUCKET=<BUCKETNAME>
REGION=<REGION>
PRIMARY_EKS=<PRIMARY CLUSTERNAME>
RECOVERY_EKS=<RECOVERY CLUSTERNAME>
REGION=<Your AWS region>
					eksctl create cluster --name=$PRIMARY_EKS --nodes=3 --node-type=t3.small --region $REGION
eksctl create cluster --name=$RECOVERY_EKS --nodes=3 --node-type=t3.small --region $REGION
					# Add two contexts to your .kube file so you can deal with them easily
#For easier management of kubectl config, we add our clusters to kubeconfig with an alias:

PRIMARY_CONTEXT=PRIMARY_velero
RECOVERY_CONTEXT=RECOVERY_velero
aws eks --region $REGION update-kubeconfig --name $PRIMARY_EKS --alias $PRIMARY_CONTEXT
aws eks --region $REGION update-kubeconfig --name $RECOVERY_EKS --alias $RECOVERY_CONTEXT

kubectl config use-context $PRIMARY_CONTEXT
# In the Production env be careful and use this command kubectl config get-contexts to check what the current context
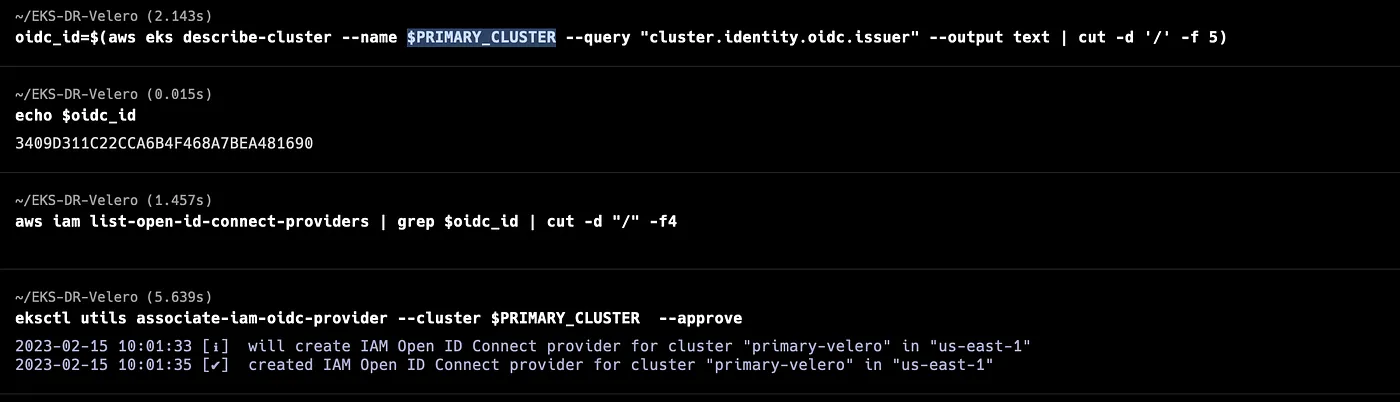
Each cluster must be configured with an EKS IAM OIDC Provider. See Create an IAM OIDC provider for your cluster. This is a requirement for IAM roles for service account which is used to grant the required AWS permissions to the Velero deployments.
					eksctl utils associate-iam-oidc-provider --cluster $PRIMARY_EKS --approve
eksctl utils associate-iam-oidc-provider --cluster $RECOVERY_EKS --approve
Step 3: Set up persistent storage in Amazon EKS useing EBS CSI driver
3.1
Download an example IAM policy with permissions that allow your worker nodes to create and modify Amazon EBS volumes:
curl -o example-iam-policy.json https://raw.githubusercontent.com/kubernetes-sigs/aws-ebs-csi-driver/v0.9.0/docs/example-iam-policy.json
3.2
Create an IAM policy named Amazon_EBS_CSI_Driver
aws iam create-policy --policy-name AmazonEKS_EBS_CSI_Driver_Policy --policy-document file://example-iam-policy.json
3.3
View your cluster’s OIDC provider URL
					oidc_id_primary=$(aws eks describe-cluster --name $PRIMARY_EKS --query "cluster.identity.oidc.issuer" --output text | cut -d '/' -f 5)
oidc_id_recovery=$(aws eks describe-cluster --name $RECOVERY_EKS --query "cluster.identity.oidc.issuer" --output text | cut -d '/' -f 5)
ACCOUNT=$(aws sts get-caller-identity --query Account --output text)
echo $oidc_id_primary
echo $oidc_id_recovery
echo $ACCOUNT
3.4
Create the following IAM trust policies file
					cat <<EOF > trust-policy-primary.json
{
  "Version": "2012-10-17",
  "Statement": [
    {
      "Effect": "Allow",
      "Principal": {
        "Federated": "arn:aws:iam::$ACCOUNT:oidc-provider/oidc.eks.$REGION.amazonaws.com/id/$oidc_id_primary"
      },
      "Action": "sts:AssumeRoleWithWebIdentity",
      "Condition": {
        "StringEquals": {
          "oidc.eks.$REGION.amazonaws.com/id/$oidc_id_primary:sub": "system:serviceaccount:kube-system:ebs-csi-controller-sa"
        }
      }
    }
  ]
}
EOF
					cat <<EOF > trust-policy-recovery.json
{
  "Version": "2012-10-17",
  "Statement": [
    {
      "Effect": "Allow",
      "Principal": {
        "Federated": "arn:aws:iam::$ACCOUNT:oidc-provider/oidc.eks.$REGION.amazonaws.com/id/$oidc_id_recovery"
      },
      "Action": "sts:AssumeRoleWithWebIdentity",
      "Condition": {
        "StringEquals": {
          "oidc.eks.$REGION.amazonaws.com/id/$oidc_id_recovery:sub": "system:serviceaccount:kube-system:ebs-csi-controller-sa"
        }
      }
    }
  ]
}
EOF
3.5
Create an IAM roles
					aws iam create-role \
  --role-name AmazonEKS_EBS_CSI_DriverRole \
  --assume-role-policy-document file://"trust-policy-primary.json"

aws iam create-role \
  --role-name AmazonEKS_EBS_CSI_DriverRole_Recovery \
  --assume-role-policy-document file://"trust-policy-recovery.json"
3.6
Attach your new IAM policies to the roles
					aws iam attach-role-policy \
--policy-arn arn:aws:iam::$ACCOUNT:policy/AmazonEKS_EBS_CSI_Driver_Policy \
--role-name AmazonEKS_EBS_CSI_DriverRole

aws iam attach-role-policy \
--policy-arn arn:aws:iam::$ACCOUNT:policy/AmazonEKS_EBS_CSI_Driver_Policy \
--role-name AmazonEKS_EBS_CSI_DriverRole_Recovery
3.7
To deploy the Amazon EBS CSI driver, run one of the following commands
					kubectl config use-context $PRIMARY_CONTEXT
kubectl apply -k "github.com/kubernetes-sigs/aws-ebs-csi-driver/deploy/kubernetes/overlays/stable/?ref=master"

kubectl config use-context $RECOVERY_CONTEXT
kubectl apply -k "github.com/kubernetes-sigs/aws-ebs-csi-driver/deploy/kubernetes/overlays/stable/?ref=master"
3.8
Annotate the ebs-csi-controller-sa Kubernetes service account with the Amazon Resource Name (ARN) of the IAM role that you created earlier
					# PRIMARY_CONTEXT --
kubectl config use-context $PRIMARY_CONTEXT

kubectl annotate serviceaccount ebs-csi-controller-sa \
  -n kube-system \
  eks.amazonaws.com/role-arn=arn:aws:iam::$ACCOUNT:role/AmazonEKS_EBS_CSI_DriverRole

kubectl delete pods -n kube-system -l=app=ebs-csi-controller


# ---------------------------------------------------

# RECOVERY_CONTEXT --
kubectl config use-context $RECOVERY_CONTEXT

kubectl annotate serviceaccount ebs-csi-controller-sa \
  -n kube-system \
  eks.amazonaws.com/role-arn=arn:aws:iam::$ACCOUNT:role/AmazonEKS_EBS_CSI_DriverRole_Recovery

kubectl delete pods -n kube-system -l=app=ebs-csi-controller


# Return Back to PRIMARY_CONTEXT
kubectl config use-context $PRIMARY_CONTEXT
In this step, make sure that you annotate the service account ebs-csi-controller-sa correctly (optional)
kubectl edit serviceaccount ebs-csi-controller-sa -n kube-system
Step 4: Prepare S3 to Save velero's backups
aws s3 mb s3://$BUCKET --region $REGION
Although Amazon S3 stores your data across multiple geographically distant Availability Zones by default, compliance requirements might dictate that you store data at even greater distances. Cross-Region Replication allows you to replicate data between distant AWS Regions to satisfy these requirements.
Step 5: Prepare IAM policy for Velero deployment
Velero performs a number of API calls to resources in EC2 and S3 to perform snapshots and save the backup to the S3 bucket. The following IAM policy will grant Velero the necessary permissions
					cat > velero_policy.json <<EOF
{
    "Version": "2012-10-17",
    "Statement": [
        {
            "Effect": "Allow",
            "Action": [
                "ec2:DescribeVolumes",
                "ec2:DescribeSnapshots",
                "ec2:CreateTags",
                "ec2:CreateVolume",
                "ec2:CreateSnapshot",
                "ec2:DeleteSnapshot"
            ],
            "Resource": "*"
        },
        {
            "Effect": "Allow",
            "Action": [
                "s3:GetObject",
                "s3:DeleteObject",
                "s3:PutObject",
                "s3:AbortMultipartUpload",
                "s3:ListMultipartUploadParts"
            ],
            "Resource": [
                "arn:aws:s3:::${BUCKET}/*"
            ]
        },
        {
            "Effect": "Allow",
            "Action": [
                "s3:ListBucket"
            ],
            "Resource": [
                "arn:aws:s3:::${BUCKET}"
            ]
        }
    ]
}
EOF

aws iam create-policy \
    --policy-name VeleroAccessPolicy \
    --policy-document file://velero_policy.json
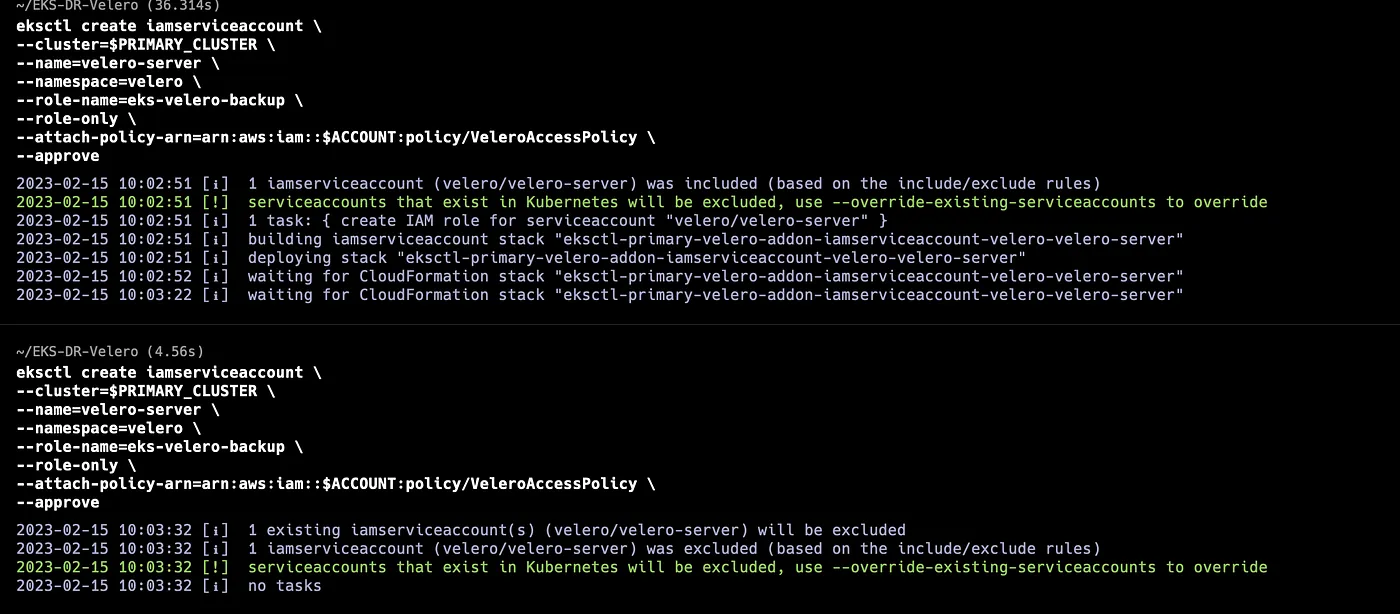
Step 6: Create Service Accounts for Velero
The best practice for providing AWS policies to applications running on EKS clusters is to use IAM Roles for Service Accounts. eksctl provides an easy way to create the required IAM role and scope the trust relationship to the velero-server Service Account.
					eksctl create iamserviceaccount \
--cluster=$PRIMARY_EKS \
--name=velero-server \
--namespace=velero \
--role-name=eks-velero-backup \
--role-only \
--attach-policy-arn=arn:aws:iam::$ACCOUNT:policy/VeleroAccessPolicy \
--approve

eksctl create iamserviceaccount \
--cluster=$RECOVERY_EKS \
--name=velero-server \
--namespace=velero \
--role-name=eks-velero-recovery \
--role-only \
--attach-policy-arn=arn:aws:iam::$ACCOUNT:policy/VeleroAccessPolicy \
--approve
The --namespace=velero flag ensures that only an workloads running in the velero namespace will be able to access the IAM Policy (VeleroAccessPolicy)
Step 7: Install Velero in both EKS Clusters
helm repo add vmware-tanzu https://vmware-tanzu.github.io/helm-charts
					cat > values.yaml <<EOF
configuration:
  backupStorageLocation:
    bucket: $BUCKET
  provider: aws
  volumeSnapshotLocation:
    config:
      region: $REGION
credentials:
  useSecret: false
initContainers:
- name: velero-plugin-for-aws
  image: velero/velero-plugin-for-aws:v1.6.1
  volumeMounts:
  - mountPath: /target
    name: plugins
serviceAccount:
  server:
    annotations:
      eks.amazonaws.com/role-arn: "arn:aws:iam::${ACCOUNT}:role/eks-velero-backup"
EOF
					cat > values_recovery.yaml <<EOF
configuration:
  backupStorageLocation:
    bucket: $BUCKET
  provider: aws
  volumeSnapshotLocation:
    config:
      region: $REGION
credentials:
  useSecret: false
initContainers:
- name: velero-plugin-for-aws
  image: velero/velero-plugin-for-aws:v1.6.1
  volumeMounts:
  - mountPath: /target
    name: plugins
serviceAccount:
  server:
    annotations:
      eks.amazonaws.com/role-arn: "arn:aws:iam::${ACCOUNT}:role/eks-velero-recovery"
EOF
We need to install the Velero server twice: once in the Primary cluster and again in the Recovery cluster. We can check that we have these new contexts with the following command: kubectl config get-contexts
Change the context to your Primary cluster and install Velero
					kubectl config use-context $PRIMARY_CONTEXT
helm install velero vmware-tanzu/velero \
    --create-namespace \
    --namespace velero \
    -f values.yaml
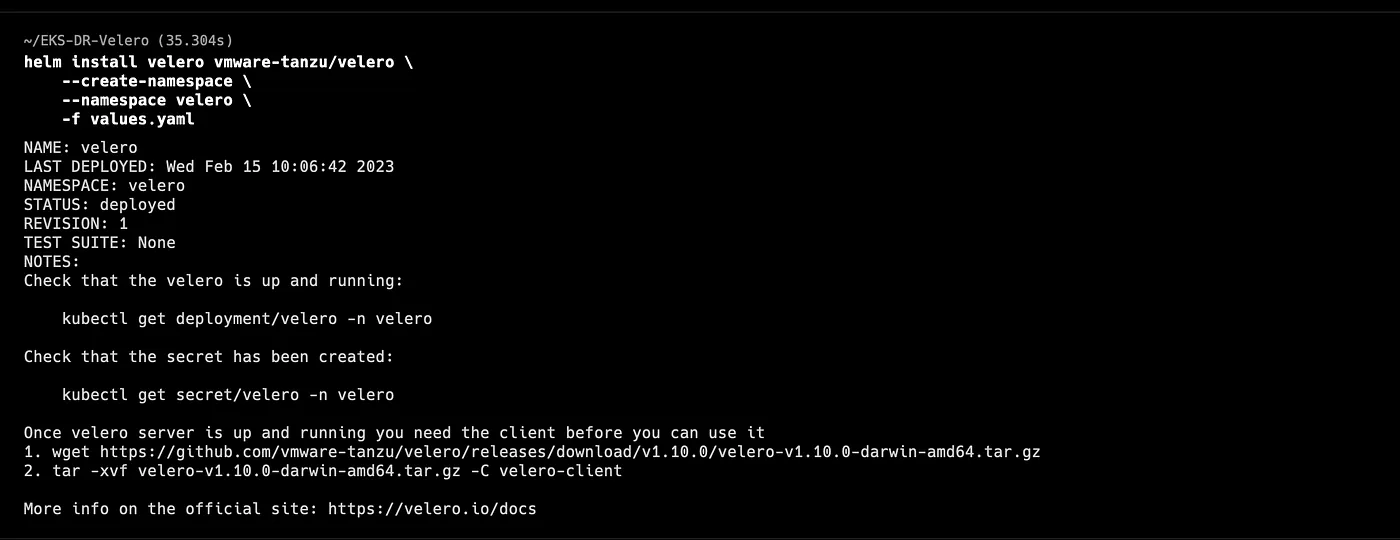
We can check that the Velero server was successfully installed by running this command in each context:
kubectl get pods –n velero
Now change the context to your Recovery cluster and proceed to install Velero
					kubectl config use-context $RECOVERY_CONTEXT
helm install velero vmware-tanzu/velero \
    --create-namespace \
    --namespace velero \
    -f values_recovery.yaml
Step 7.1: Install Velero in both EKS Clusters
Velero operates by submitting commands as CRDs. To take a backup of the cluster, you submit to the cluster a backup CRD. These can be difficult to create by hand, so the Velero team has created a CLI that makes it easy to perform backups and restores. We will be using the Velero CLI to create a backup of the Primary cluster and restore to the Recovery cluster.
Installation instructions vary depending on your operating system. Follow the instructions to install Velero here.
Step 8: Backup and restore Ghost application
Ghost is an open-source publishing platform designed to create blogs, magazines, and news sites. It includes a simple markdown editor with preview, theming, and SEO built-in to simplify editing.
We will use the Bitnami Helm chart as it’s commonly deployed and well-tested. This chart depends on the Bitnami MariaDB chart that will serve as the persistent data store for the blog application. The MariaDB data will be stored in an EBS volume that will be snapshotted by Velero as part of performing the backup.
Now we switch to the Primary cluster’s context and install Ghost (ignore the notification ERROR: you did not provide an external host that appears when you install Ghost. This will be solved with the following commands):
					helm repo add bitnami https://charts.bitnami.com/bitnami

kubectl config use-context $PRIMARY_CONTEXT
helm install ghost bitnami/ghost \
    --create-namespace \
    --namespace ghost


export APP_HOST=$(kubectl get svc --namespace ghost ghost --template "{{ range (index .status.loadBalancer.ingress 0) }}{{ . }}{{ end }}")
export GHOST_PASSWORD=$(kubectl get secret --namespace "ghost" ghost -o jsonpath="{.data.ghost-password}" | base64 -d)
export MYSQL_ROOT_PASSWORD=$(kubectl get secret --namespace "ghost" ghost-mysql -o jsonpath="{.data.mysql-root-password}" | base64 -d)
export MYSQL_PASSWORD=$(kubectl get secret --namespace "ghost" ghost-mysql -o jsonpath="{.data.mysql-password}" | base64 -d)

helm upgrade ghost bitnami/ghost \
  --namespace ghost \
  --set service.type=LoadBalancer,ghostHost=$APP_HOST,ghostPassword=$GHOST_PASSWORD,mysql.auth.rootPassword=$MYSQL_ROOT_PASSWORD,mysql.auth.password=$MYSQL_PASSWORD
Ghost is an open-source publishing platform designed to create blogs, magazines, and news sites. It includes a simple markdown editor with preview, theming, and SEO built-in to simplify editing.
We will use the Bitnami Helm chart as it’s commonly deployed and well-tested. This chart depends on the Bitnami MariaDB chart that will serve as the persistent data store for the blog application. The MariaDB data will be stored in an EBS volume that will be snapshotted by Velero as part of performing the backup.
Now we switch to the Primary cluster’s context and install Ghost (ignore the notification ERROR: you did not provide an external host that appears when you install Ghost. This will be solved with the following commands):
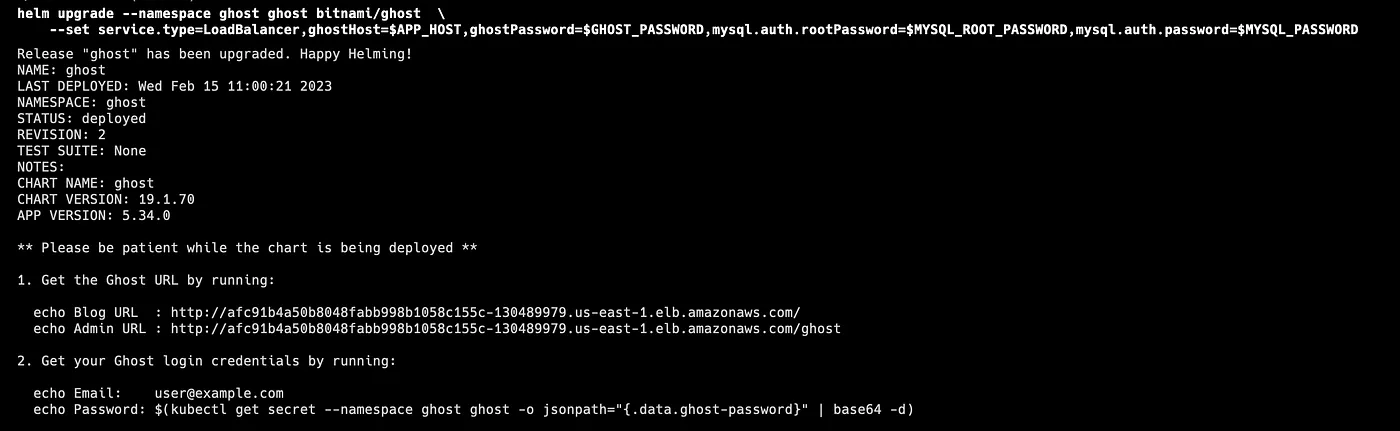
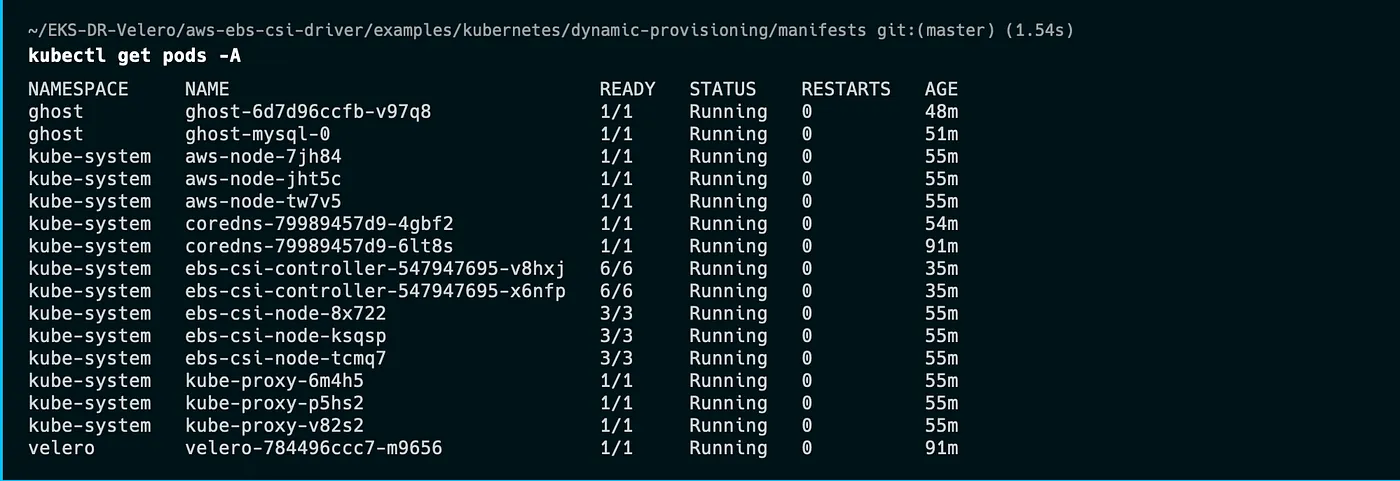
We can check that the installation was successful by running this command: kubectl get pod -A
In the Ghost Admin console, you can create an example blog post that will be included in the backup and restore process by signing in (using the Admin URL displayed above). As a result, the backup includes not only the application deployment configuration but also the posts in the blog database that is saved in PV — EBS.
Step 9: Backup Primary Cluster
Create a backup of the Primary cluster. Be sure to switch your kubectl context back to the Primary cluster before running the command below.
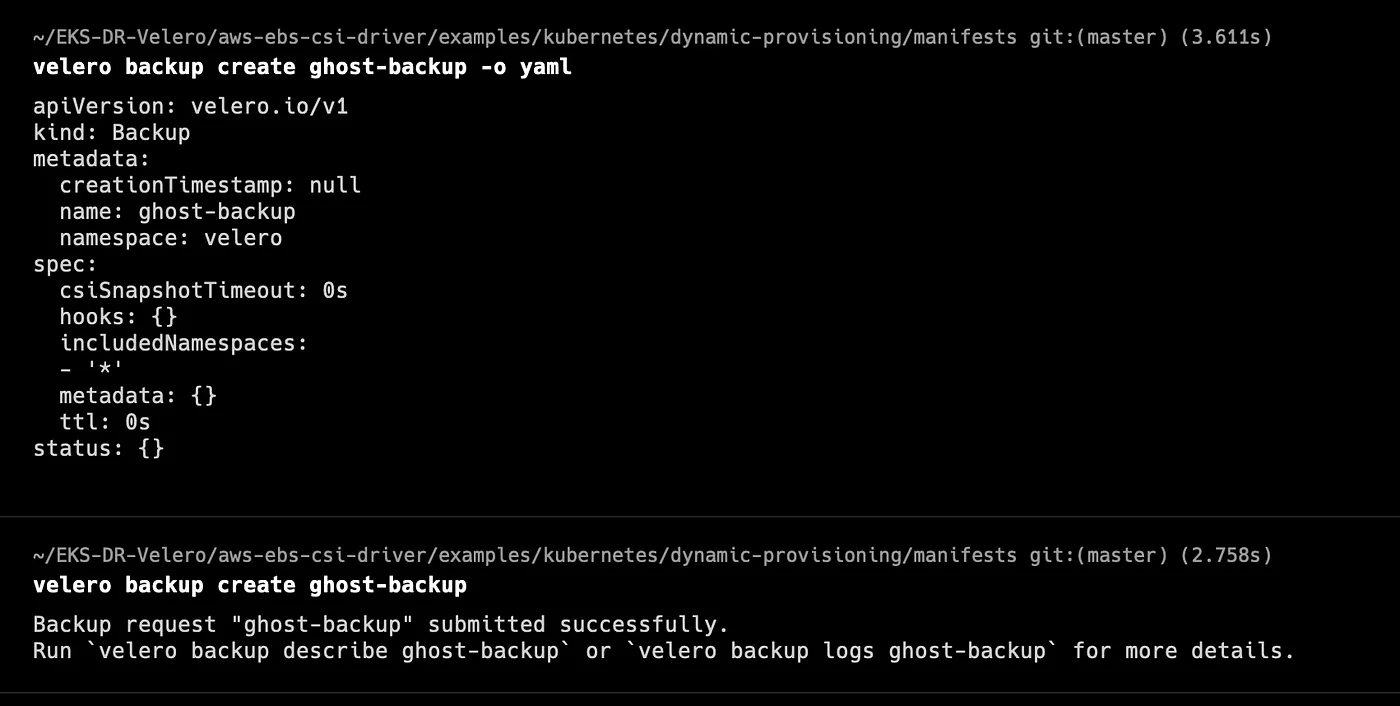
We can see how a Velero backup CRD looks like by using the -o flag, which outputs the backup CRD YAML without actually submitting the backup creation to the Velero server.
					kubectl config use-context $PRIMARY_CONTEXT

# Check out the outputs of configurations file
velero backup create ghost-backup -o yaml

velero backup create ghost-backup
We can also see the backup files created by Velero in the Amazon S3 bucket we previously created:
aws s3 ls $BUCKET/backups/ghost-backup/
Step 10: Validate the Backup
Let’s check the status of the backup and validate that backup has been completed successfully.
velero backup describe ghost-backup
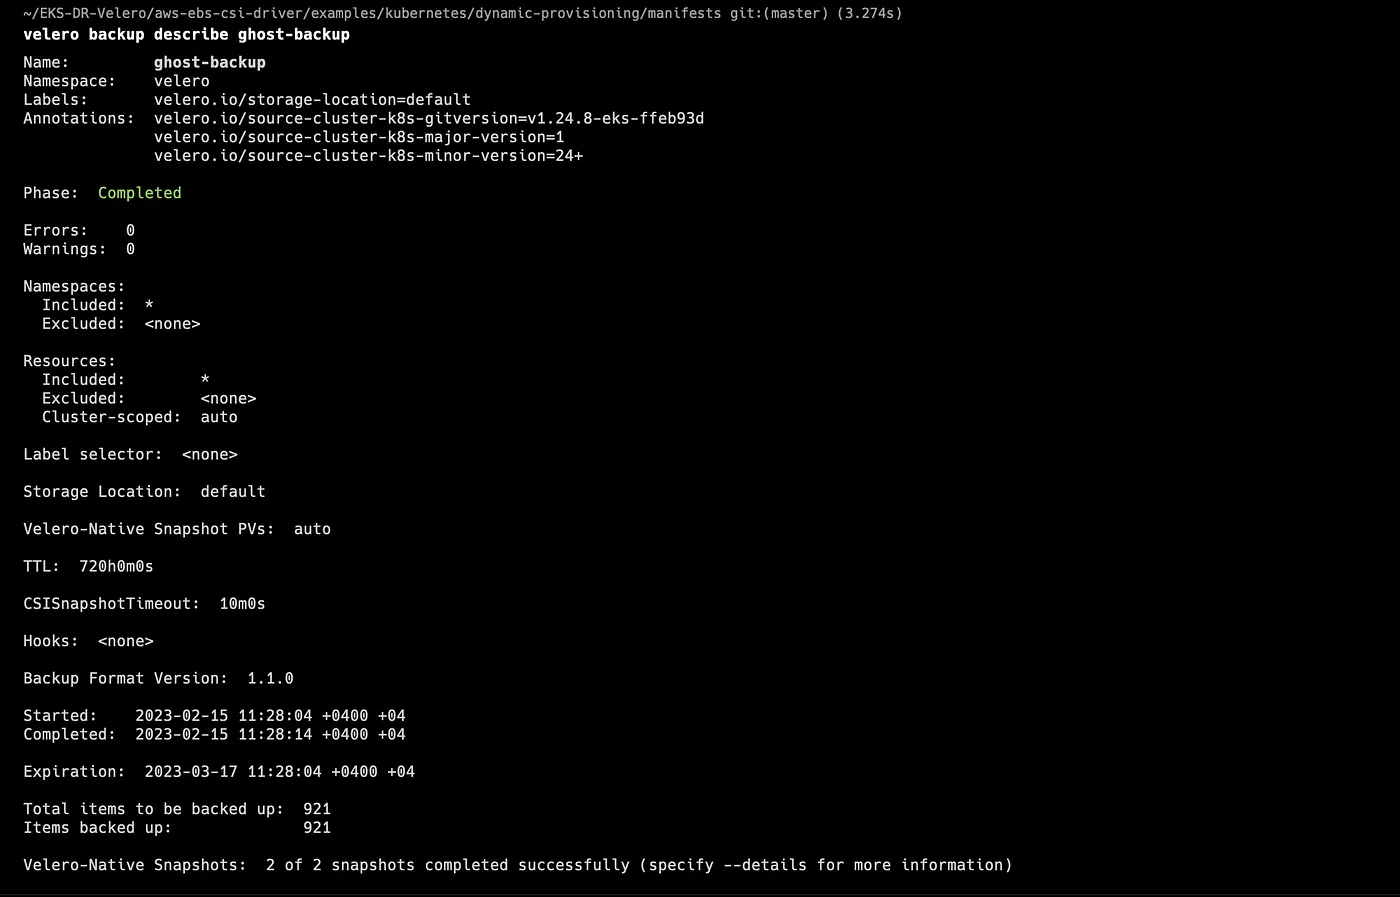
Check out the field Phase: in the output. If the current Phase is InProgress, then wait a few seconds and try again until you see the Phase: Completed.
Step 11: Restore the app into the Recovery cluster
					# Switch your kubectl context to your Recovery cluster.
kubectl config use-context $RECOVERY_CONTEXT

velero restore create ghost-restore \
    --from-backup ghost-backup \
    --include-namespaces ghost
you can check the services in the ghost namespace as below:
kubectl -n ghost get svc ghost
Validate that the restoring processes have been completed by visiting the URL under EXTERNAL-IP, and check if your previous post is existing.
You might need to change the DNS for your production environment and assign it to a new EKS cluster
Step 12: Schedule a Backup
The schedule operation allows you to create a backup of your data at a specified time, defined by a Cron expression.
velero schedule create NAME --schedule="* * * * *" [flags]
Cron schedules use the following format.
					# ┌───────────── minute (0 - 59)
# │ ┌───────────── hour (0 - 23)
# │ │ ┌───────────── day of the month (1 - 31)
# │ │ │ ┌───────────── month (1 - 12)
# │ │ │ │ ┌───────────── day of the week (0 - 6) (Sunday to Saturday;
# │ │ │ │ │                                   7 is also Sunday on some systems)
# │ │ │ │ │
# │ │ │ │ │
# * * * * *
For example, the command below creates a backup that runs every 30 minutes.
velero schedule create ghost-schedule --schedule="*/30 * * * *"
This command will create the backup, ghost-schedule within Velero, but the backup will not be taken until the next scheduled time, Every 30 minutes.
Backups created by a schedule are saved with the name <SCHEDULE NAME>-<TIMESTAMP>, where <TIMESTAMP> is formatted as YYYYMMDDhhmmss. For a full list of available configuration, flags use the Velero CLI help command.
For more details check Velero Backup Reference
Cleaning up
To avoid incurring future charges, delete the resources. If you used eksctl to create your clusters, you can use eksctl delete cluster <clustername> to delete the clusters.
					# Delete PRIMARY_EKS Cluster
eksctl delete cluster $PRIMARY_EKS

# Delete RECOVERY_EKS Cluster
eksctl delete cluster $RECOVERY_EKS

# Delete S3  Bucket
aws s3 rb s3://$BUCKET --force
Conclusion
In conclusion, Velero is a powerful tool for managing backups and restores of Kubernetes applications, and it’s a great fit for running on EKS. With Velero, you can easily backup your Kubernetes resources, including your applications, volumes, and configuration data, to an S3 bucket, and restore them in case of a disaster or data loss. With Velero on EKS, you can also easily migrate your applications across clusters or regions, and ensure your data is securely stored and protected. Additionally, Velero provides advanced features like scheduling backups, specifying backup retention policies, and validating backups, making it a versatile tool for managing your Kubernetes workloads on EKS.
Overall, Velero on EKS is a great solution for anyone looking to simplify their backup and restore process for Kubernetes applications, while taking advantage of the scalability and flexibility of EKS. Whether you’re a developer, a DevOps engineer, or a cloud administrator, Velero can help you ensure your Kubernetes workloads are always available and protected, so you can focus on delivering value to your users.

Mohammad Jomaa